Counter-Strike 2 (CS2) offers more than a thousand console commands that can unlock an unprecedented level of control over how the game looks, feels, and performs. But with so many hidden codes to customize or optimize your gameplay, it can be challenging to even know where to start.
In this guide, we’ll detail all the CS2 console commands you need, explaining what they do and the conditions required to run them. We’ll also outline how to enable the console and create an autoexec.cfg file to automate your configuration every time you launch the game.
1. How To Enable And Use The Console In CS2
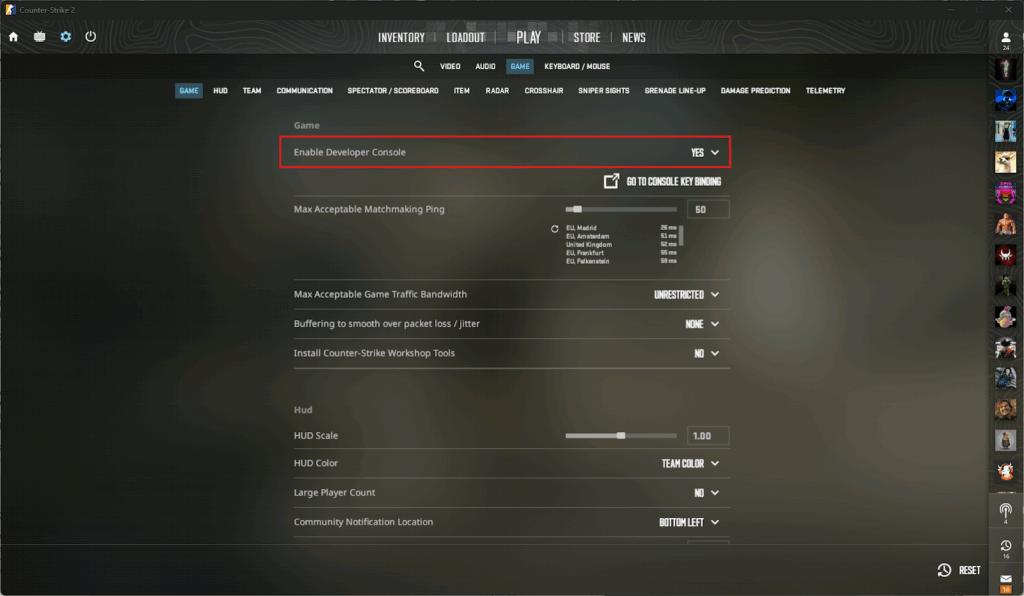
Before you can use any of the CS2 console commands, you need to enable the Developer Console. Without it, you simply won’t be able to input the codes necessary to customize or optimize your game. Here’s how:
- Open Steam
- Launch Counter-Strike 2
- Open the Settings menu (i.e., the gear icon in the top-left corner)
- Click on the Game tab
- Toggle Enable Developer Console to “Yes”
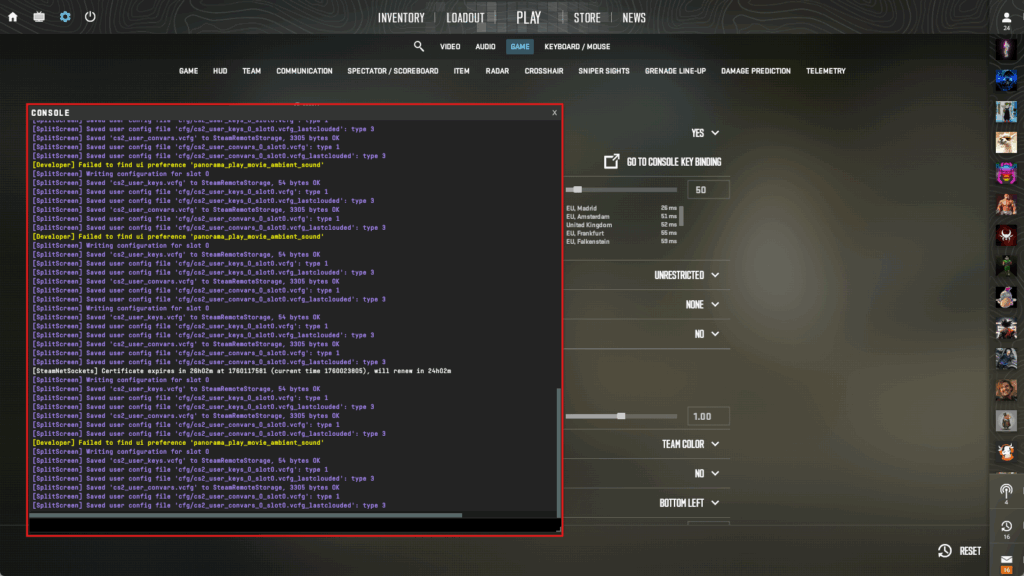
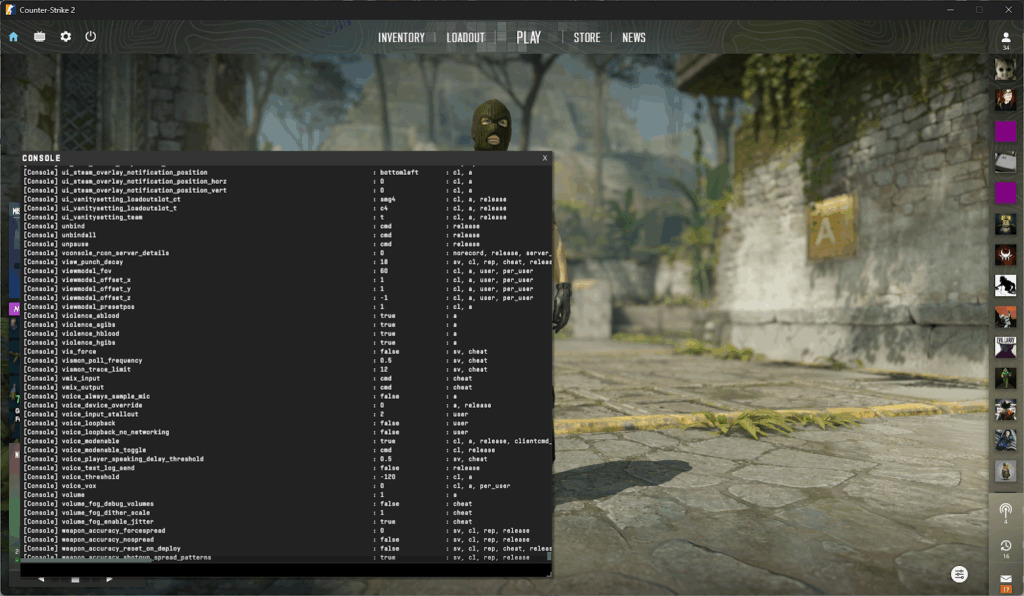
How To Use The Developer Console In CS2
Once enabled, you can open the Developer Console by pressing the tilde (~) or backtick (`) key. This is located between the ESC and TAB keys, though its exact symbol and position can differ depending on your keyboard layout.
Now, all you have to do is enter any CS2 console command in the text box. For example, you can type cl_crosshairsize 3 to get a tighter reticle than the default length or cl_drawhud_force_deathnotices 0 to turn off the kill feed. Then, press Enter to activate it.
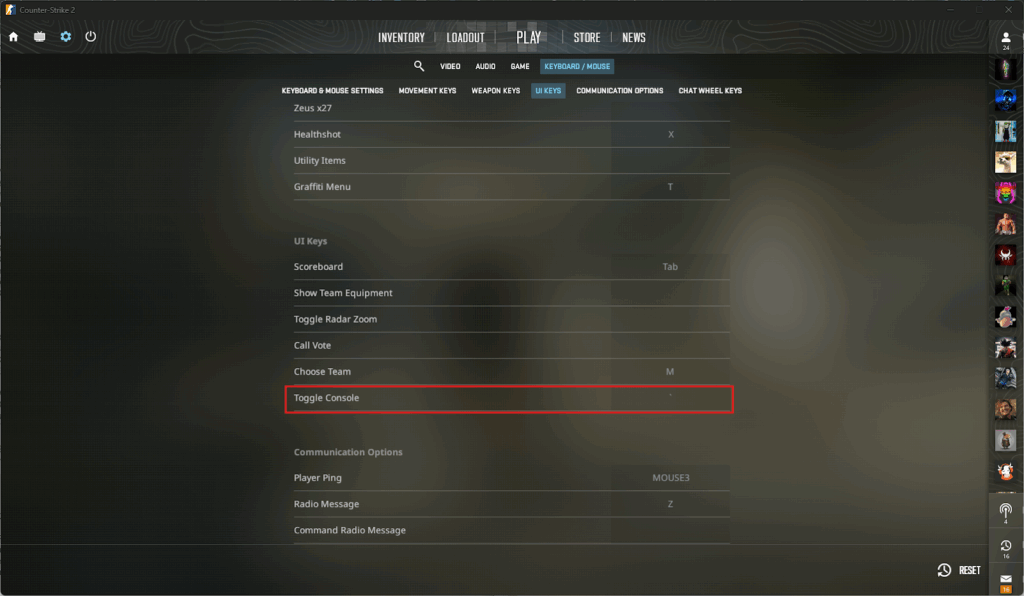
If the default shortcut (`/~) doesn’t work (or you prefer to use another hotkey), you can easily rebind the Developer Console. To do this, go to Settings → Keyboard/Mouse → UI Keys → Toggle Console. After that, simply click on the field next to it and press the key you want to assign.
2. Categories And Overview Of CS2 Console Commands
There are at least a thousand active and hidden CS2 console commands, giving players control over nearly every aspect of the game. Most were migrated from Counter-Strike: Global Offensive (CS:GO)’s now-deprecated Source engine, but many were renamed, changed, or removed.
To make sense of them, the commands can be grouped into distinct categories, covering everything from visuals and performance to bots, practice modes, and server setups. Below is an overview of all the different console command groups in CS2 and some examples of what they offer.
FOV & Viewmodel Controls
These commands control how your weapon and camera appear in-game, helping you find a setup that feels comfortable and less distracting, especially when aiming. The viewmodel_offset_x command moves your gun left or right, while viewmodel_fov changes how close or far your weapon looks on screen. Even things as simple as being able to change your gun to your left hand.
Bot Management
Bots are great for solo practice, but console commands can make them even more powerful. For example, you can manipulate their behavior with instructions like bot_add_ct or bot_add_t to assign them to specific teams, bot_difficulty to set their skill level, or bot_mimic to make them copy your actions.
Crosshair Controls
Crosshairs directly affect both accuracy and reaction time, and they’re highly personal. Commands like cl_crosshairsize (sets the length), cl_crosshairgap (spacing), cl_crosshairstyle (style), and cl_crosshaircolor (color) let you personalize every detail to create a reticle that’s truly yours.
Heads-Up Display (HUD) Customization
The HUD shows loads of vital intel (e.g., radar, scores, kill feed, health, and ammo), but it can get quite distracting. Thankfully, you can use console commands like cl_hud_color (changes HUD color), cl_autohelp 0 (disables hints), and cl_hide_avatar_images 1 (hides avatars) to declutter the interface and improve your focus.
Gameplay
CS2 console commands are incredible for solo practice, helping you improve your aim, recoil control, and overall game sense. For example, sv_grenade_trajectory shows grenade flight paths to perfect your lineups, while sv_showimpacts displays bullet impact points for learning spray patterns. Some binds and gameplay modifiers are banned online or have been discouraged by Valve.
Performance
Some commands (e.g., cq_netgraph and cl_showfps) show real-time performance stats and network data on the HUD, and others (e.g., fps_max) let you unlock the frame limit for more responsive gameplay. Together, they make it easier to diagnose lag, stutter, and performance drops in matches.
Weapon And Equipment Management
If you’re testing loadouts or recoil patterns in CS2, console commands like give <weapon code> and sv_infinite_ammo let you instantly swap weapons or get infinite ammo in custom servers. Others, like ammo_grenade_limit_total are perfect for rehearsing lineups without constant restocking.
Server And Match Setup
As a server host, you can use commands to control match durations (mp_timelimit), autobalance teams (mp_autoteambalance), set the cash cap (mp_maxmoney), and even restrict player capacity (sv_visiblemaxplayers). These commands are both efficient and essential for scrims and coaching.
Demo And Replay Tools
There are many console commands designed specifically with analysts in mind. For example, mp_warmup_end skips warmups, mp_restartgame resets rounds, mp_buy_anywhere enables global purchases, and sv_cheats unlocks advanced testing tools for trying or capturing special moments.
Pro Tip: You can use the command cvarlist to view a partial list of console commands. The only catch is that it’s not exhaustive, as many more hidden commands aren’t accessible unless you enable specific flags (like sv_cheats 1) or are a developer.
3. Creating And Using An Autoexec Config File
Entering CS2 console commands can be tedious, especially if you want to apply many gameplay or performance customizations. What’s worse, these configurations reset every time you quit the game.
That’s where the autoexec.cfg file can help. It’s essentially a simple script that stores all your preferred commands and loads them automatically when CS2 launches, and it’s super easy to set up. Here’s how:
How To Create An Autoexec.cfg In CS2
- Launch the Steam client on your PC
- Click on the Library tab
- Browse the list of games for Counter-Strike 2
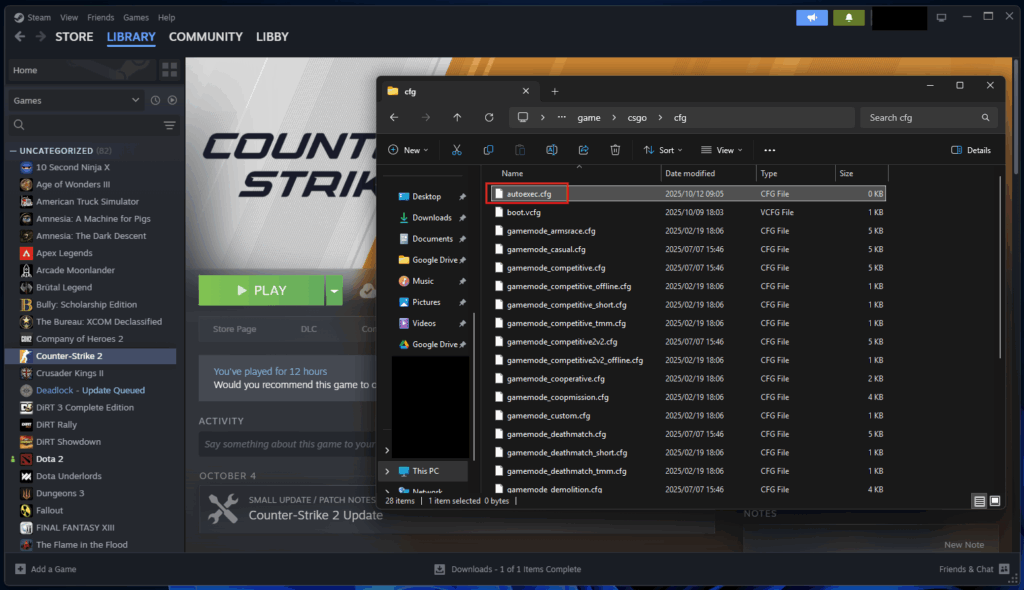
- Right-click on it and select Manage → Browse local files
- Go to game → csgo → cfg
- Create a new .txt file anywhere in this folder
- Rename the file to “autoexec.cfg” (double-check it’s not saved as autoexec.cfg.txt)
- Open the file in any text editor
- Type all the CS2 console commands you want to launch at startup
- Save and close the file
It’s generally a good idea to create a shortcut to the autoexec.cfg file on your desktop so you can easily change or remove any console commands later.
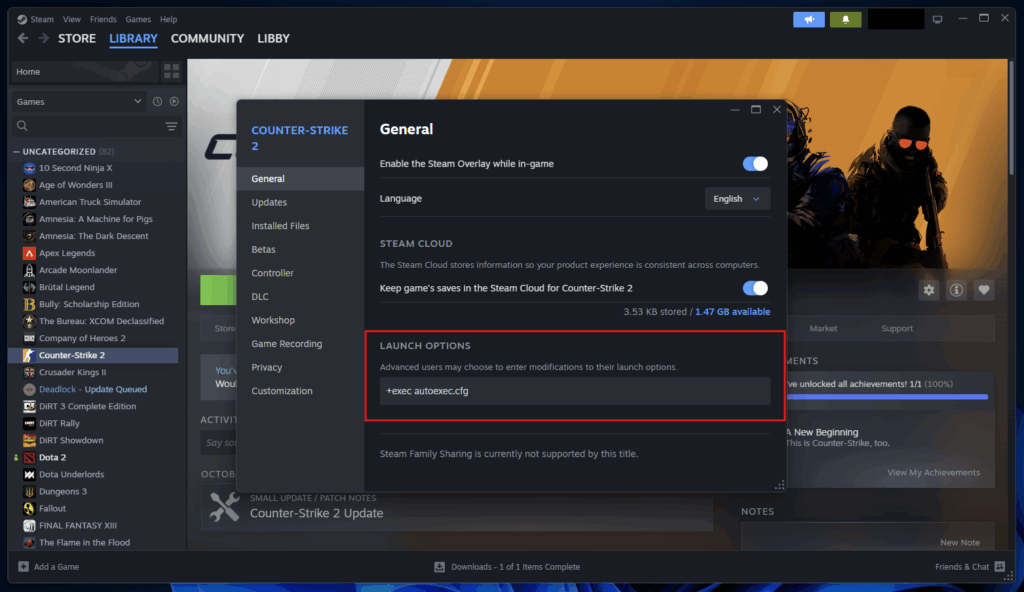
After creating the file, the next step is to activate it via the Counter-Strike 2 launch options:
- Open your Steam Library again
- Right-click on Counter-Strike 2 and select Properties
- Look for Launch Options on the General tab
- Type +exec autoexec.cfg into the text box
- Close the window
From here, any valid console commands stored in your autoexec.cfg file will automatically be applied whenever you launch CS2. Just remember that any extra commands you enter into the Developer Console while you’re playing won’t carry over unless you saved them in the autoexec.cfg file.
Why Should You Use An Autoexec File?
An autoexec.cfg file saves you time by automatically applying your preferred settings every time CS2 launches. It’s especially useful if you’ve built a detailed setup with multiple configurations, which would otherwise take time and effort to activate manually via the Developer Console.
More importantly, autoexec.cfg files ensure consistency. The same sensitivity, viewmodel, key binds, or crosshair settings you used to train your muscle memory will always be applied. This keeps your gameplay stable and predictable.
CS2 updates can occasionally reset in-game settings and, in turn, disrupt your configuration. By storing your personal preferences in your autoexec file, you protect your custom setup and ensure they’re applied. This should you not have to constantly remember individual CS2 Console Commands.
4. CS2 Console Commands-Based Customization: Crosshair, HUD, And Radar
Now that you know how to use console commands and set up your autoexec file, let’s explore all the customization options available in CS2.
Crosshair Customization
Crosshairs are vital to gunplay, impacting your ability to track targets, control recoil, and maintain consistent aim between rounds. Whether you’re chasing the best CS2 crosshair codes used by pros or have your own design, these commands will give you total control over how your reticle looks and behaves in-game.
| Command | Description | Example / Values |
| cl_crosshairstyle # | Changes the crosshair style (static, classic, or dynamic). | cl_crosshairstyle 2 (0 = disabled, 1 = disabled, 2 = default, 3 = disabled, 4 = default static, 5 = hybrid) |
| cl_crosshairsize # | Sets the length of crosshair lines. | cl_crosshairsize 3 (default: 5) |
| cl_crosshairthickness # | Adjusts the crosshair line thickness | cl_crosshairthickness 1 (default: 4.41819) |
| cl_crosshairgap # | Modifies the gap between crosshair lines. | cl_crosshairgap -2 (default: 1) |
| cl_crosshairgap_useweaponvalue # | Adjusts the crosshair gap dynamically based on the equipped weapon. | cl_crosshairgap_useweaponvalue 1 (default: 1 = on, 0 = off) |
| cl_crosshairdot # | Adds a central dot to the crosshair. | cl_crosshairdot 0 (default: 1 = on, 0 = off) |
| cl_crosshair_t # | Enables “T-style” crosshair (removes top line). | cl_crosshair_t 0 (default: 1 = on, 0 = off) |
| cl_crosshaircolor # | Sets the crosshair color using preset codes. | cl_crosshaircolor 2 (0 = Red, 1 = Green, 2 = Yellow, 3 = Blue, 4 = Cyan) |
| cl_crosshaircolor_r/g/b # | Sets custom crosshair RGB values. | cl_crosshaircolor_r 50 (range: 0 to 255 per channel) |
| cl_crosshairalpha # | Adjusts the transparency of the crosshair. | cl_crosshairalpha 200 (range: 10 to 255) |
| cl_crosshairusealpha # | Enables alpha transparency for the crosshair. | cl_crosshairusealpha 1 (default: 1 = use alpha, 0 = ignore alpha, ) |
| cl_crosshair_drawoutline # | Adds a dark outline for better visibility. | cl_crosshair_drawoutline 1 (default: 1 = on, 0 = off) |
| cl_crosshair_outlinethickness # | Controls the thickness of the outline. | cl_crosshair_outlinethickness 1 (range: 0 to 3) |
| cl_crosshair_sniper_width # | Sets the width of the sniper crosshair when scoped. | cl_crosshair_sniper_width 2 (default: 1, value in pixels) |
| cl_fixedcrosshairgap # | Adjusts fixed crosshair spacing for static styles. | cl_fixedcrosshairgap 3 (default: 3) |
| cl_crosshair_friendly_warning # | Displays a warning when aiming at teammates. | cl_crosshair_friendly_warning 1 (default: 1 = on, 0 = off) |
| cl_observed_bot_crosshair # | Shows or hides the crosshair when spectating a bot. | cl_observed_bot_crosshair 1 (default: 0 = off, 1 = show when bot is controllable, 2 = always show bot crosshair) |
HUD Customization
The HUD is the nerve center of your CS2 gameplay. It’s where every piece of vital information appears, including ammo, health, player counts, and round timers. These next CS2 console commands can help you reduce clutter and make key details easier to read during those high-pressure rounds.
| Command | Description | Example / Values |
| cl_hud_color # | Changes the HUD’s color scheme. | cl_hud_color 4 (default: 0 = team color, 1 = white, 2 = bright white, 3 = light blue, 4 = blue, 5 = purple, 6 = red, 7 = orange, 8 = yellow, 9 = green, 10 = aqua, 11 = pink) |
| cl_drawhud # | Shows or hides the entire HUD. (great for screenshots or b-roll). Requires sv_cheats 1. | cl_drawhud 0 (default: 1 = on, 0 = off) |
| cl_teamcounter_playercount_instead_of_avatar # | Switches between numeric or avatar-based player count displays. | cl_teamcounter_playercount_instead_of_avatars 1 (default: 0 = avatars, 1 = numbers) |
| cl_drawhud_force_deathnotices # | Toggles death notifications. | cl_drawhud_force_deathnotices 1 (default: 0 = deathnotices display, 1 = draw deathnotices even if HUD is disabled, -1 = force no deathnotices) |
| hud_scaling # | Adjusts the overall HUD size for different resolutions. | hud_scaling 0.85 (range: 0.5 to 0.95) |
| safezonex / safezoney # | Moves the HUD closer to or farther from the screen edges. | safezonex 0.9, safezoney 0.9 (range: 0 to 1) |
Radar Customization
The radar is more than just a mini-map in CS2; it’s a live feed of critical intel. And with the proper commands, you can get the most out of how it behaves. For example, you can have zoomed-out static radars for strategic oversight (great for IGLs) or a tighter rotating view for instant feedback (perfect for entry fraggers).
By adjusting console commands that control zoom, centering, and rotation, you can transform the radar into a custom tactical tool that works for you.
| Command | Description | Example / Values |
| cl_radar_scale # | Controls the radar zoom level. | cl_radar_scale 0.7 (range: 0.25 to 1.0) |
| cl_radar_rotate # | Toggles radar rotation to match your player’s facing direction. | cl_radar_rotate 1 (default: 1 = rotate with player, 0 = static) |
| cl_radar_always_centered # | Keeps your player icon centered on the radar or allows the map to move freely based on your position. | cl_radar_always_centered 0 (default: 1 = always centered, 0 = radar is maximally used) |
| cl_radar_icon_scale_min # | Adjusts the size of player icons and markers on the radar. | cl_radar_icon_scale_min 0.8 (range: 0.4 to 1.25) |
| cl_radar_square_with_scoreboard # | Makes the radar shape square when the scoreboard is open. | cl_radar_square_with_scoreboard 1 (default: 0) |
5. Managing Bots And Custom Game Setups
In the next section, we’ll explore how you can use console commands to fill private matches with bots and adjust their behavior to create personalized training environments.
Bot Management CS2 Console Commands
Bots may not replace human players anytime soon, but they’re great tools for running aim drills, lineup practices, entry setups, or rehearsing executes. They’re also great for testing custom maps, recording b-roll, or trying unorthodox strategies you wouldn’t usually attempt in real games.
The CS2 console commands below will help you get the most out of bots to create almost any scenario you want. Just note that these commands work best in private or locally hosted servers with sv_cheats 1 enabled.
| Command | Description | Example / Values |
| Bot_add <type> <difficulty> <name> | Adds a random bot to the game. | bot_add t 0 Bob (adds an Easy difficulty bot named Bob to the Terrorist side) <type>t = Terrorist, ct = Counter-Terrorist <difficulty>0 = Easy, 1 = Normal, 2 = Hard, 3 = Expert <name>[user specified] |
| bot_add_ct <difficulty> <name> | Adds a bot to the Counter-Terrorist team. | Bot_add_ct (default difficulty: 2, random name assigned) |
| bot_add_t <difficulty> <name> | Adds a bot to the Terrorist team. | Bot_add_t (default difficulty: 2, random name assigned) |
| bot_kick | Removes all bots from the match. | bot_kick |
| bot_difficulty # | Sets the global difficulty level for bots. | bot_difficulty 0 (0 = Easy, 1 = Normal, 2 = Hard, 3 = Expert) |
| bot_dont_shoot # | Prevents bots from firing their weapons. Requires sv_cheats 1. | bot_dont_shoot 1 (default: 0 = off) |
| Bot_mimic # | Spawns a bot that mirrors your movements and actions. Requires sv_cheats 1. | bot_mimic 1 (default: 0 = normal behavior, 1 = enable mimic) |
| bot_zombie | Freezes all bots in place. Requires sv_cheats 1. | bot_zombie 1 (default: 0 = off) |
| bot_crouch | Forces all bots to crouch. Requires sv_cheats 1. | bot_crouch 1 (default: 0 = off) |
| bot_place | Spawns a bot at your crosshair location. Requires sv_cheats 1. | bot_place |
Game Mode And Practice Setup
Once you master bot management, you can take it a step further by customizing the practice lobby itself. The following CS2 console commands will let you modify timers, remove round limits, balance teams, or enable instant respawns, all perfect for quick scrims, training, and coaching drills.
| Command | Description | Example / Values |
| game_type # | Defines the game category (used with game_mode). Each type unlocks specific modes | 0 = Classic, 1 = Gun Game, 2 = Training, 3 = Custom, 4 = Cooperative, 5 = Skirmish, 6 = Free For All, 7 = Workshop (reserved) |
| game_mode # | Sets the specific mode within the selected game_type. | game_type 0:0 = Casual, 1 = Competitive, 2 = Wingman, 3 = Weapons Expert, 4 = Training Day game_type 1:0 = Arms Race, 1 = Demolition, 2 = Deathmatch game_type 2:0 = Training game_type 3:0 = Custom game_type 4: 0 = Guardian, 1 = Co-op Strike game_type 5:0 = War Games game_type 6:0 = Danger Zone |
| mp_roundtime # | Sets the round length in minutes. | mp_roundtime 5 (range: 1 to 60) |
| mp_maxrounds # | Controls how many rounds are played per match. | mp_maxrounds 30 (default: 15) |
| mp_timelimit # | Sets the game time limit in minutes. | mp_timelimit 45 (default: 0) |
| mp_warmup_start | Starts the warm-up session. | mp_warmup_start |
| mp_warmup_end | Ends the warm-up session. | mp_warmup_end |
| mp_restartgame # | Restarts the match after a specified number of seconds. | mp_restartgame 10 (default: 0) |
| mp_ignore_round_win_conditions # | Removes round-end conditions for endless practice. | mp_ignore_round_win_conditions true (default: false) |
| mp_limitteams # | Controls maximum team imbalance allowed. | mp_limitteams 0 (default: 2, 0 = check disabled) |
| mp_autoteambalance # | Enables or disables automatic team balancing. | mp_autoteambalance true (default: true) |
| mp_respawn_on_death_ct # | Enables instant respawn for CTs. | mp_respawn_on_death_ct true (default: false) |
| mp_respawn_on_death_t # | Enables instant respawn for Ts. | mp_respawn_on_death_t true (default: false) |
6. Optimizing Game Performance With Console Commands
Beyond customization, CS2 console commands are equally powerful for improving in-game performance, even on low-end systems. They can boost frames, reduce lag, cut out distractions, and even stop large unnecessary assets from loading.
Better yet, every change is reversible, allowing you to experiment with whatever setup feels best without worrying about accidentally breaking something. Here are a few quick examples of commands you can use for a smoother game:
- Frame rate and responsiveness: Commands like cl_showfps and cq_netgraph allow you to track your frames and network indicators. Meanwhile, fps_max can increase the frame limit to improve responsiveness while aiming, moving, and shooting.
- Visual clarity: By disabling non-essential visual effects like ragdolls and glow effects, you can reduce CPU render load and boost visibility in gunfights. It can also promote faster reaction time and better clarity in high-pressure situations.
- Audio tuning: The commands volume, snd_musicvolume, and sv_voiceenable will help isolate vital sound cues (e.g., footsteps and reloads) by reducing distractions from background music and chatter, enabling you to pinpoint enemy movements accurately.
- UI visibility: Using commands like cl_hide_avatar_images and viewmodel_offset_x can declutter your screen. This improves your ability to track opponents and boosts your reaction speed in critical moments.
Best CS2 Console Commands For Performance
This table breaks down all the CS2 console commands you can use to optimize your game performance:
| Command | Description | Example / Values |
| fps_max # | Caps or uncaps your frame rate. | fps_max 0 (default: 400, 0 = no limit) |
| cl_showfps # | Displays your FPS counter. | cl_showfps 1 (default: 0 = off, 1 = on, 2 = smooth FPS, 3 = server MS, 4 = show FPS and log to file ) |
| cq_netgraph # | Shows ping, packet loss, and choke stats on the HUD. Requires sv_cheats 1. | cq_netgraph 1 (default: 0) |
| cl_disable_ragdolls # | Removes ragdoll physics to reduce CPU load. Requires sv_cheats 1. | cl_disable_ragdolls true (default: false) |
| r_csgo_enable_glows # | Disables glossy effects on players, weapons, and items. Requires sv_cheats 1. | r_csgo_enable_glows false (default: true) |
| mat_fullbright # | Brightens map lighting for testing or visibility. Requires sv_cheats 1. | mat_fullbright 1 (default: 0 = off) |
| volume # | Adjusts master volume. | volume 0.8 (range: 0 to 1) |
| snd_musicvolume # | Controls only music volume. | snd_musicvolume 0 (range: 0 to 1) |
| sv_voiceenable # | Toggles voice chat on or off. | sv_voiceenable false (default: true) |
| cl_autohelp # | Disables in-game hints. | cl_autohelp false (default: true) |
| cl_hide_avatar_images # | Hides all player avatars. | cl_hide_avatar_images 1 (default: 0 = off, 1 = block all, 2 = block all but friends) |
| viewmodel_offset_x # | Moves the weapon model horizontally for visibility. | viewmodel_offset_x 2 (range: -2.5 to 2.5) |
| viewmodel_presetpos # | Loads preset weapon positions. | 1 = Desktop, 2 = Couch, 3 = Classic |
7. FAQs And Command Safety for CS2 Console Commands
Many players think that console commands in CS2 can trigger VAC bans—but that couldn’t be further from the truth. Valve intentionally built this feature into the game, making it among the safest and most effective tools for personalizing your in-game experience.
However, if you’re still unsure about which commands are safe to use, these frequently asked questions (FAQs) will clear up any confusion.
Can I Get Banned For Using Console Commands In CS2?
No. As long as the commands you enter don’t grant an unfair advantage or alter gameplay beyond what’s allowed, they’re perfectly safe to use on official servers.
Are CS2 Console Commands The Same As Cheats?
Not exactly. Unlike wallhacks or aimbots, console commands aren’t exploits. They’re legitimate tools meant for customization. While some “cheat” codes like sv_infinite_ammo (infinite ammo) and noclip (enables flying) exist, they only work in private servers.
Will My Commands Save After I Close The Game?
No. Commands entered manually into the Developer Console reset after CS2 is closed. The only exception is commands saved in the autoexec.cfg file. Once configured, it will automatically run your prescribed settings the next time the game is launched.
Do Pro CS2 Players Also Use Console Commands?
Yes, nearly all CS2 pros rely on console commands and autoexec.cfg files to personalize their setup. Many of them also use codes in custom training maps or solo warm-ups to refine aim, practice recoil control, or test grenade lineups.
Can I Use Wallhacks Or Aimbot Commands In CS2 Matches?
No, wallhacks and aimbots are external cheat programs, and using them is a bannable offense. Although there are some commands like god, which (when enabled) turn players invincible, they only work in private servers with sv_cheats 1 enabled.
Why Do Some CS2 Console Commands Not Work?
Many commands originate from CS:GO and were explicitly developed for the old Source engine, but no longer function in Source 2. If a command fails, it’s usually because it’s deprecated, misspelled, or limited to specific environments, such as private servers or developer builds.
Can You Deactivate Console Commands In CS2?
Yes, every console command in CS2 is reversible. You either re-enter the default value or toggle it off. If something breaks (or you don’t know what changed), you can also restart the game to reset all custom settings to their original state.
Always practice Responsible Gambling and check out our latest promo offers and boosts. T&Cs apply. 18+ to play.